In this blog post, we’re gonna be talking about server onboarding on discord, as well as details on how we at Alloverse designed and implemented our own bot for the purpose. Finally, we’ll go into detail how you can access our bot’s source code so you can adjust it for your own use case.
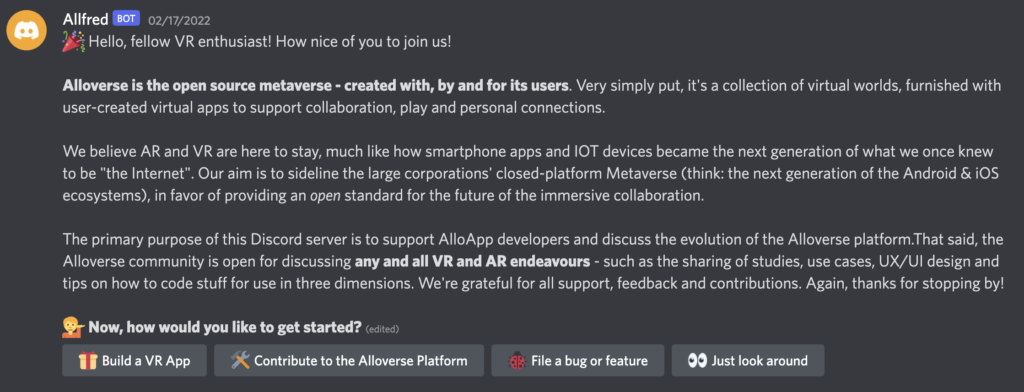
Long time readers know that we at Alloverse use Discord as the central hub for community outreach. Unfortunately, anyone who’s joined a Discord server know that its first impressions can be pretty overwhelming. As a new user, you tend to land in the server’s #welcome channel to be greeted with a pre-set welcoming message without regard to the user’s particular reason for joining. Due to its “one-size-fits-all” nature, said welcoming message is generally a wall of text reminiscent of a terms of service, in turn containing a plethora of links to more information on a wide variety of topics.
The opportunity to provide the user with a smooth onboarding is thus lost, and users run a high risk of losing interest solely because they weren’t presented with relevant information. Even with our relatively meagre number of public channels we, too, run a significant risk of falling into this trap by not providing bite-sized information and quickly guiding users to relevant contexts and conversations.
So, we thought, how can we improve this user experience? There must be Discord bots out there allowing for the creation of decision tree traversal in order to guide new users using progressive disclosure, right?
Wrong. We joined the 10-something biggest Discord communities and spent a full day searching for bots to fill our purpose. Alas, to no avail.
So it must be because Discord’s bot API:s don’t support this kind of functionality, right?
Wrong. Cursory googling quickly reveals that it is indeed within the capability of the Discord API.
So here we are. Welcome to the journey of developing our own Discord Onboarding Bot: Allfred. (Named after Batman’s butler, with an Alloverse twist. Very creative, we know.)
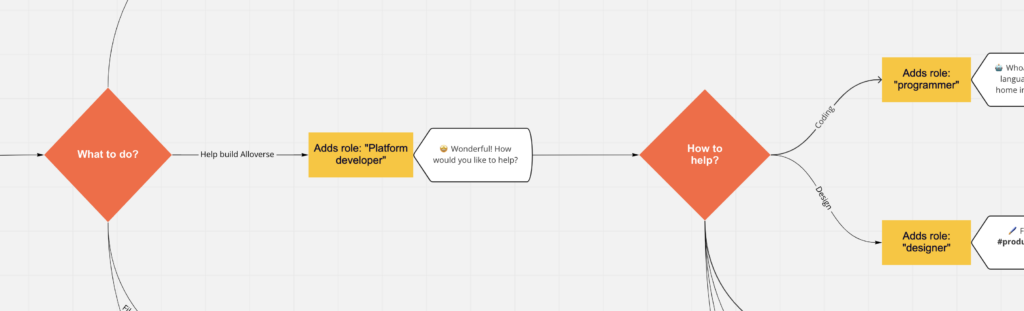
Designing the decision tree
The Alloverse Discord gathers developers, designers and open source enthusiasts alike. Some are interested in the Alloverse platform itself, some are interested in building apps on top of it, and others are just curious about following our development. In order to provide each of them with a relevant onboarding experience, we needed to figure out what roles and channels are suitable to recommend for each of our target groups.
In our case, we’re focusing on populating our #welcome channel with a bot that can:
- Display the Alloverse elevator pitch
- Ask what the new user what their skills are and what they want out of joining the server.
- Provide optional responses, such as:
- Provide roles like 👩💻 coder or 👨🎨 designer .
- Link to relevant channels like #app-development or #feature-suggestions.
Then, If need be, we repeat the cycle with new, contextual information and questions.
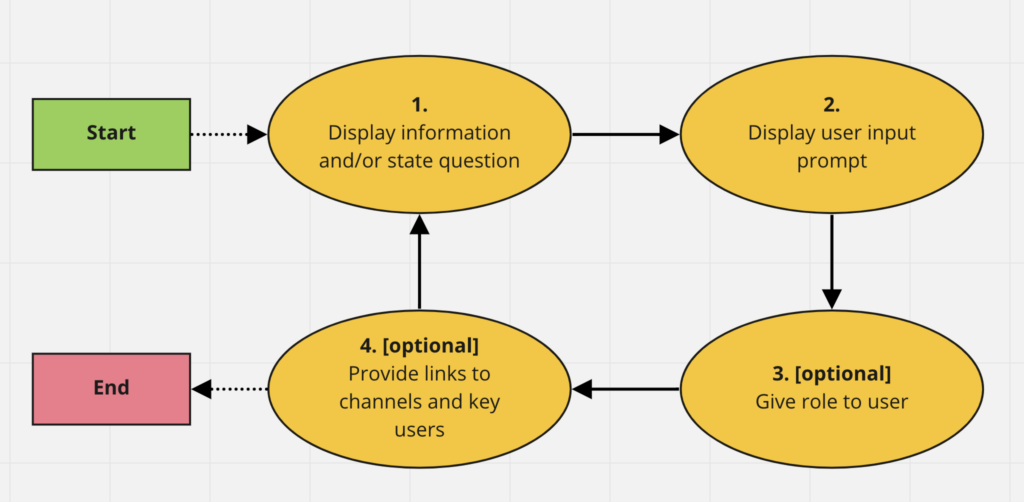
Additionally, on the admin side, we want a channel to ping us when someone interacts with the bot. That way we can personally reach out to that user in a context where we know what they’re looking for.
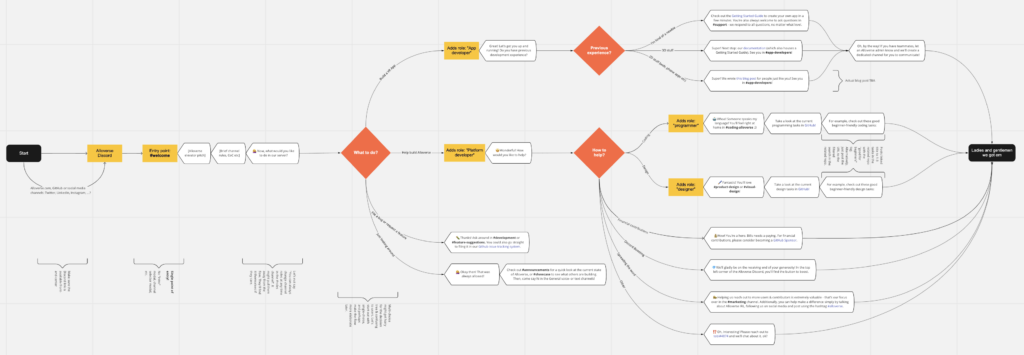
After having established this basic flow, we sat down to design the full decision tree, complete with all information, options and responses. This turned out to be a very useful exercise, and was iterated upon several times to ensure a flow that contained all vital information, yet was short enough to avoid tedium.
Implementing the bot
Our initial (pre-design) research had already revealed to us that there are several bot-building frameworks available for use. However, we soon found that most of them didn’t (yet) support the button-with-label component we needed for user input.
This narrowed our list of options to two: Discord’s own framework discord.js and the python framework nextcord. After comparing respective quick start guides we eventually chose the latter, as it became clear that nextcord is more helpful with server communication, leaving only the application code for us to worry about.
Why? Because nextcord utilises Pythons async/await to make it really easy to get going and write asynchronous code in in a synchronous manner, and decorators (the @bot.event etc above methods) to hook into the frameworks event loop.
import os, nextcord
bot = commands.Bot()

@bot.slash_command()
async def hello(interaction: nextcord.interaction):
    await interaction.send(f"Greetings {interaction.user.mention}")

bot.run(os.env("SECRET_DISCORD_TOKEN"))
The example above registers a ‘slash command’ (/hello) that responds with a mention of the user that invokes it.
We won’t go much further into specifics here since the code is available for anyone to check out, and we’re happy to answer questions about it in our Discord. But here are some resources that we found especially useful during development and might help you get started:
- Discord Developer Portal by the Discord team.
- Making a Wordle Clone Discord Bot with Python (Nextcord) and Assigning Roles with Buttons, both by Jonah Lawrence Dev Pro Tips
Result, and open source
In the end, we reached the goals we set out for, and we’re quite happy with the result! Since you’ve read this far, you should come try it out yourself to get the full experience. Join our Discord and you’ll find Allfred in the #welcome channel!
Alloverse is all about open source, and thus we’d love to share our bot with you! As it stands, however, the source code contains a variety of secret Discord IDs that should best remain secret, so we’re unable to share the repository as-is. That said, if there’s interest in retrieving the bot’s source code, let us know in our Discord and we’ll happily publish a “clean” version for you on our GitHub Repository!
Thanks for reading! Have a nice day 🙂

